Pools have always traditionally been luxury items that only the mega-rich could afford. As times have changed, there have been more options for those with lower budgets, and now there are more options than ever to get pools in your home.
Read Next
Over the years, many DIY solutions have been created to allow everyone to build their own pool. People have been taking to social media to showcase their DIY pools and share their secrets with others who can follow in their stead, leading to huge trends across the country each year.
Last year we saw the rise of the ‘hillbilly hot tub’ or stock tank pool. This took old drinking troughs that horses and cows had used and repurposed them into small pools. While this quickly became a popular option, it wasn’t the easiest to set up and was more expensive than first thought.
No products found.
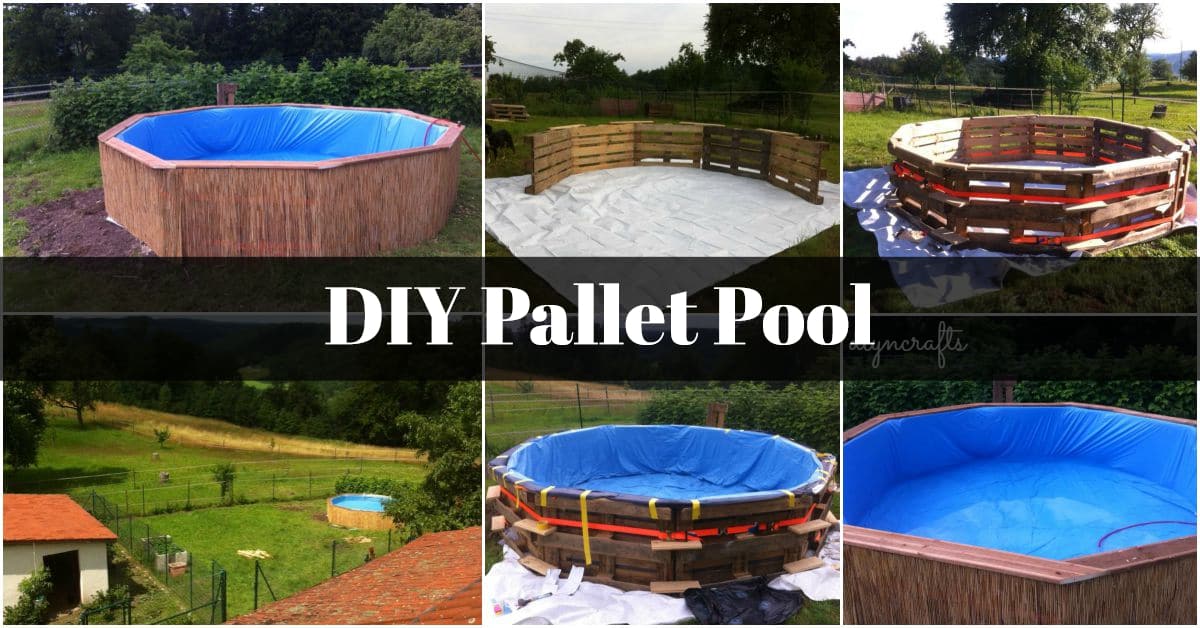
Top 10 DIY Pallet Pool

Now, we’re seeing the rise of the pallet pool. This new alternative approach to creating your own pool is proving to be one of the cheapest and easiest ways to have a pool in your backyard.

What is a Pallet Pool?
Pallet pools are the latest DIY solution sweeping the nation. For most people, a permanent pool isn’t practical because it costs too much, or we just don’t have the weather to use it year-round.
A pallet pool is a temporary pool made mostly from old wooden pallets. Unlike traditional pools, pallet pools are extremely cheap and designed so you can put them together and take them down when you no longer need them.

How Much Does A Pallet Pool Cost?
The overall cost of a pallet pool will vary depending on exactly where you can source your materials.
Typically, you should expect it to cost between $20-$30 for all the materials, and you can do all the work yourself.
This means no expensive charges to builders and brings the costs down.
What Do You Need For A Pallet Pool?
Before taking on any DIY job, you should make sure you have all the tools needed. Thankfully, for a pallet pool, you don’t need too much and can get the job done with minimal materials.
Below is a list of everything you should make sure you have handy before you start:
1. Pallets
Pallets are most commonly seen in supermarkets or other shops. They’re used to transport goods, but for this DIY, they’re the materials for the pool frame. For the most part, you will use the pallets as they are, but you will need to strip off some panels for other elements.
Pallets can be bought second-hand cheaply, and some shops will even give them away for free. You shouldn’t have any trouble tracking them down.
No products found.
2. Tarpaulin
Tarpaulin is a heavy-duty, waterproof cloth or canvas that is used for a number of different purposes. The pallet pool will form the basis of the waterproof layer, which will keep the water contained. It’s readily available in most hardware or DIY stores and is very inexpensive.
No products found.
3. Plywood
Plywood is a strong wooden board that is made by gluing different layers together. It’s used in furniture and all manner of household items, but for a pallet pool, it provides extra support to the structure. This will help it stay upright and last longer.
Other than these materials, all you’ll need is some household tools. A hammer, nails, screwdriver, and screws will all be essential. You should also consider using protective gloves or eyewear to protect yourself as you work.
No products found.
How Do You Build A Pallet Pool?
One of the best features of a pallet pool is its simplicity. We’ve taken you through the steps below, which should tell you have to build a pallet pool from scratch:
- Identify a suitable space for the pallet pool within your garden, making sure you have enough room to build it. Remove any turf or debris and use a shovel to flatten down the earth. It’s important to get this as level as possible before moving on to step 2.
- Lay a thick tarp on the ground and use pegs to hold it in place. This will be important to minimize any leaking from the pallet pool.
- Take the wooden pallets and arrange them into the desired shape for the pool. This will most likely be square or rectangular, but you can opt for a round design. Once you have these in place, you should secure them with bricks for now because you nail wooden supports across.
- Use tarpaulin to create a waterproof seal on the inside of the pool. This should be double-layered to ensure the pool can keep the water contained within it. Use staples to secure this in place.
- Once this is completed, you should use some wooden planks from the pallets to create a rim around the top. You can then fill the pool with water from the hose, and once that’s done, you can start using it.

Advantages of a Pallet Pool
Pallet pools allow everyone to build their own pool at home. While it is only a temporary structure, if it’s well made, it’s very sturdy and could last a long time.
Like all DIY projects, you only get out what you put in. A pallet pool can be a very basic structure that does what it needs to and no more.
Alternatively, you can create a pallet pool that’s sanded down and varnished and looks even better than most professionally installed fixed features.


If you’re comfortable with DIY projects and like to make things perfect, a pallet pool is a great opportunity to showcase your creativity and make something you’re proud of.
The pallet pool is also extremely customizable. Again, it depends on your DIY prowess, but you can incorporate additional features like a solar heater and a ladder for getting into and out of the pool.
No products found.
These make the overall pool more user-friendly and bring the DIY model much closer to the expensive pools in terms of quality.
Overall, the biggest advantages of the pallet pool are how cheap it is and how easy it is to set up. For under $50, and with less than a day’s work, you can have a great pool that you and your family can enjoy. It’s one of the best ways to improve your backyard and make the most of the Summer.
Regina Mack says
More of a question. How do you do the corners and do you have any pictures to go with instructions.
Rex says
Once you have your base leveled and lined to protect the pool liners or tarps from getting holes, line up your pallet sides and screw them together. Your corners will depend on your pool shape (will they be angles like with a hexagon or octagon, or squared). Either way, the easiest way to do the corners is to lay the liners, remove all of the creases, and shape them for holding water. Affix the tarp using a sandwich formation (place the tarp between two boards and then secure to the top sides of the pool). These fitted boards do not have to be square in your corners.
Hope that helps - ask anything more to clarify if needed. Thanks!