Read Next
Why Do You Need A Soaker Hose?
Having a soaker hose or drip hose in your backyard can be incredibly efficient for quite a number of reasons.
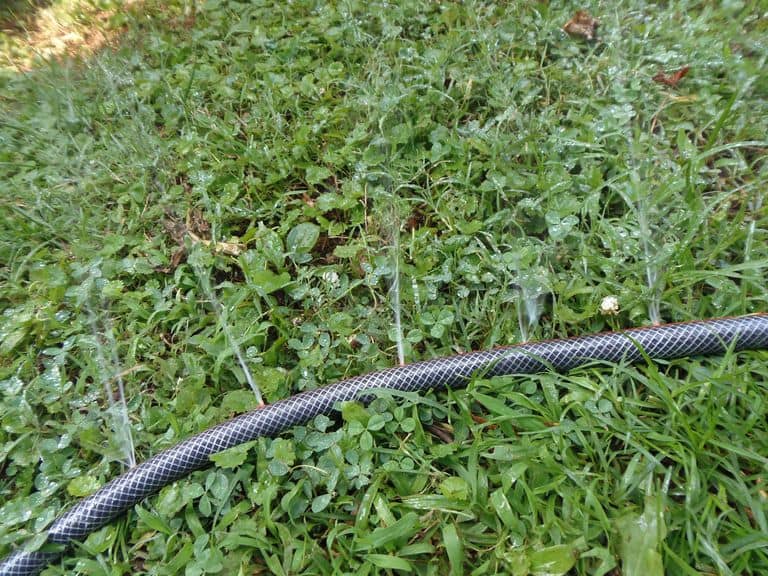
One of their greatest strengths is that they are effective at saving water and in the process money. This is because the water slowly seeps out of pores created along the hose at a regular distance rather than randomly flinging water around the garden as a sprinkler does.
This eventually translates into lesser runoffs and consequently, less water is wasted. This is especially advantageous in the summer or during water scarcity.
Since summer comes around at least once every year, having the knowledge of making your own soaker hose at almost no cost is a big plus economically.
The step-by-step instructions outlined below should help you with how to make a soaker hose for your garden and possibly help you become a backyard boss.


Equipment You Will Need
The process itself is relatively simple and should take no more than five minutes. You will require the following equipment to follow along with this tutorial.
- A garden hose
- Ailing twine or a clamp
- A drill and a 1/16” drill bit
Alternatively, you could opt for a hammer and a 20d nail.
A Few Points To Note
- Soaker hoses do not compensate for pressure and thus won’t work well along upwards slopes.
- They only work well to lengths of up to 200 feet because beyond this length, the flow, and pressure of the water decrease exponentially. In essence, not enough water will be delivered to any plants beyond this point.
- Some hoses are made of recycled rubber and are not suitable for use if you want to water food crops.
Making Your Soaker Hose
1. Get A Garden Hose
You should first ensure you have a suitable garden hose at hand. It should be long and flexible enough to be able to snake through the whole length of your garden.
Pro tip: This would probably be a good time to put that old leaky water hose lying around the garage to good use.
2. Get Some Working Space
- It is important that you get a hard immovable surface to place your hose on during your work.
- This greatly minimizes the chances of errors when you are drilling or hammering the holes
3. Create The Soaker Holes


- Depending on your preferred method, drill or hammer the holes approximately 2-3 inches apart.
- Ensure you drill completely through the hose.
Pro tip: It’s a good idea to drill the first hole about 18” from the female end of the hose. However, this majorly depends on the distance between your water source and the garden.
4. Ensuring It Doesn’t Lose Pressure
Seal off the male end of the hose if you do not see the need to connect the hose to another in the near future. If you perhaps have expansion plans for your garden, you could just tie it up with bailing twine, clamp it shut, or crimp it over backward and wrap it up in electrical tape.
Pro tip: If your water source gives off the water at really high pressure, you may need a tighter method of fastening the end rather than just tying it up.
This ensures when the water reaches the end of the hose, it creates a backward pressure on the water inside the hose rather than just pouring out. This will also cause the water to seep out from the holes at a slightly higher pressure.
If you connect several soaker hoses end to end, most of the water through the hoses will seep from the hose that is closest to the tap; less water will reach the end of the hose.
5. Laying Out The Water Hose
Ensure you leave out enough length of the hose from the female end before you connect it to the water source.
You can avoid uneven distribution of water by setting up different watering zones with around 100 feet of the soaker hose in each zone. A good way of switching the water from zone to zone would be to use quick-connect couplings or Y valves.
Snake the hose through the base of the plants in the garden and depending on your future intentions with the watering system (whether you want it to be movable or not) you have one of two options:
If you want it to be permanent, bury it about two inches underground. This is especially a great idea if you are going to curl it around so it can cover the same length of the garden around in rows. You should space the rows a uniform distance apart to provide a homogeneous soaking area before burying it.
Note that you should use a layer of mulch to reduce evaporation rather than soil. If this is the case, ensure you regularly remove the end cap from your soaker hose and you also flush the soaker hose with water to remove clogs that may have built up. This is a lot more common if you buried your hose.
If you have plans for expansion and want to move the watering system somewhere in the near future, you should wire pins specifically designed for the purpose to hold the pipe in place.
As you wind the soaker hose through your garden, make an extra loop around plants that need the most water (hydrangeas and cannas for example), but keep the hose a few inches away from the plant stems.
Otherwise, the space of the hose is about 24 inches apart over clay or loamy soils and around 12 inches apart on sandy soils.
6. Your Water Source
Connect your new watering system to whatever watering source you use and wait a few minutes for the hose to fill up with enough water and for the pressure to build up inside the hose.
Pro tip: If your hose doesn’t have a high-pressure regulator, keep the faucet turned low such that the water only seeps out rather than squirt from the pores. Alternatively, you could get a plastic pressure reducer and place it inside the hose coupling to protect it from splitting under high pressure
Leave the water through the hose until the water penetrates about 6 to 12 inches into the ground (significantly less for shallow-rooted annual plants, a bit more for bushy plants, perennials, and shrubs). Use a trowel to help you gauge the soil moisture and calculate the approximate amount of time for a thorough soak.
If you have a hard time remembering when to turn off the faucet, get a hose timer and set it up to save you the hassle. You should preferably get one with built-in rain sensors. These can detect if the ground around is wet and skip your scheduled watering.
A Few Final Pro Tips
When moving your hose in the future, you may find it a little difficult due to kinks that form as a result of being highly coiled over a long period of time. To get them out, disconnect the hose from the water source and leave it out in the sun. Let it warm up for about an hour or more and it should be flexible enough to move.
If you followed the tutorial on how to make a soaker hose for your garden, you should now have a working watering system for your garden that will save you a lot of time and water.
It should also help you keep the rate at which you water your plants in check, preventing the over-watering of your precious plants.


Comments
No Comments